Paper Craft Ideas for Easter

It’s no surprise that at Zetta Florence, we love quality paper. This is why we have put together a list of paper craft ideas the whole family can do together this Easter.
These craft ideas can easily be made from items within your home, without having to go out and purchase a heap of materials. Having some good quality and colourful paper on hand really elevates your craft!
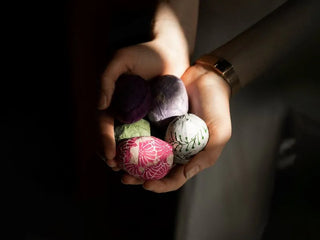
1. Colourful Paper Eggs
A great way to get the kids involved is crafting these beautiful handmade paper eggs. They can be used as a table decoration for your Easter lunch or in an egg hunt for those not looking to indulge in too much chocolate.
Tip: these eggs are only as beautiful as the paper you use, so we recommend something with bright colourful patterns. You can use any colourful paper lying around at home, however, we recommend our handmade Nepalese wrapping paper.
Materials
- Colourful Paper – A3 sheet or more
- Foam Eggs: you can find these at craft stores such as spotlight
- PVA Glue
- Paintbrush
Method
Step 1 – Cut your paper into small triangles, large enough to wrap around the circumference of your egg. The pieces of paper do not need to be even in size or shape and you can also rip the edges to get a more natural & rustic look.
Step 2 – Using the paintbrush, apply the PVA glue in an even layer over one triangle of paper.
Step 3 – Stick the paper onto the foam egg and use the paintbrush to smooth out the glue and paper. It doesn’t matter if the glue gets on the outside of the paper or on the rest of the egg as you will be covering it with more paper!
Step 4 – Repeat with the rest of the paper until the egg is covered. This method is similar to a papier-mâché type of technique so that the paper is smooth and covers the egg.
Step 5 – Leave to dry. Once the eggs are completely dry they are ready to display!
2. Easter Greeting Cards with Wax Sealing
Making cards for each other is a great way to have some time out from our devices and get back to the basics. For kids, letter writing may seem like a tiring and boring activity, so we suggest using wax seals to make it more fun and interesting.
Some tips for Wax Sealing:
- Temperature: The temperature of the wax is very important. If it is too hot, the wax can turn blackish in parts and spill over the paper. Try only heating the wax until it drips easily from the wick if using a stick, or until it is just completely melted if using the wax spoon.
- Use a practice mat: for best results, practice making your seals on a silicone mat or something the wax can be peeled off easily. Once you are happy with your seal, you can then add it to your envelope using 3M double-sided stickers. This will also mean your paper won’t get damaged in the process!
3. Bunny Garland
Another cute use of paper is by making an Easter Bunny garland. This is a simple way to add a touch of festivity to your home. Hang the garland over your fireplace for an Autumnal finish, or string in the kitchen window so the paper catches the sunlight.
For the paper, try using our handmade paper with dried petals for an understated, organic look. This paper is thick enough so that it will hold its shape as a garland.
If you are making this with materials from the home, pages from an old book can be a quaint and effective solution. You will need to reinforce the paper, however, with cardboard or thick card so that it holds its shape.
Materials
- Neutral coloured, thick paper (at least 120gsm)
- Jute Twine
- Scissors
- Cotton Wool
- Cardboard or thick card (if applicable)
- Hole puncher
Method
Step 1 – Make a template for your bunny cut-outs by drawing your shape on a piece of cardboard or stiff paper.
Step 2 – Once you’re happy with your bunny, use the template to cut the other pieces of paper so they are all the same shape and size. You can make as many or as little bunnies as you like, depending on how long you want the garland to be.
Step 3 – Stick the cotton wool onto their backs using either double-sided tape or PVA glue
Step 4 – Cut your twine to the length you would like, making sure to leave ample twine on each end to hang up your garland.
Step 5 – Take a hole puncher and make holes in each of the bunnies’ two ears. If you do not have a hole puncher you can try cutting a small slit in the ears for the twine to go through, being careful not to rip the paper.
Step 6 – Thread the twine through each of the bunnies’ ears, alternating the direction, i.e. back to front, then front to back.
Step 7 – You are ready to hang your bunnies!
Key Products


