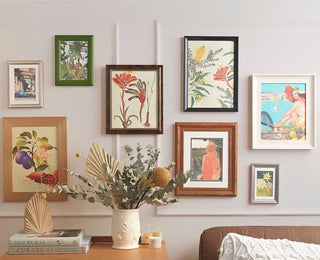
How to successfully create a gallery wall
Re-decorate your home to beat the winter blues
With the winter weather at its coldest, we’re spending more time indoors, which means having a cosy yet interesting space to live and work in can be incredibly important. One way to spruce up your living room or home office is by creating your own gallery wall. We have put together some suggestions to help you successfully create a gallery wall at home.
Tip 1: Collect & Curate
Start by collecting pieces of art and memories you love. This doesn’t mean that you need to start spending large amounts on expensive paintings. You can include photographs, prints, original art, and that super cute drawing by a niece or nephew. If you have an out-of-date calendar (such as one of Zetta Florence’s Art Calendars) you can start by cutting up the pages and framing them, or look through old magazines for cute vintage prints. You can even create your own collage!
Curate your collected art by selecting which ones work best together. Try choosing a theme, whether it be by colour, shape or content to consolidate your collection.
Tip 2: Framing
Framing is a very important part of creating your gallery wall as it can determine where your eye is drawn to. The right frame can really elevate your art, however, the wrong frame can leave it looking totally wrong.
The best place to look for cost-effective frames is an op-shop or charity store. You can often find frames of all different shapes and sizes, especially more vintage-looking frames. You never know what gems you might find. This will also reduce the cost of your gallery wall as new frames can be quite expensive.
Tip 3: Layout
To determine the layout of your gallery wall, we suggest laying all of your selected art on the floor first. This means that you can move pieces around to get a feel of what looks best. Under no circumstances should you start drilling into your wall unless you are happy with your layout! For the best layout:
- Start with your largest piece and place it slightly off-centre. This will be the anchor for your gallery wall and will usually draw the eyes to it first.
- Your second-largest piece should be away from the first largest. This gives balance to your wall.
- Mix horizontal and vertical lines to give depth and complexity to your wall.
- Make a mini-grid of some of your smaller items to give your wall some structure.
Tip 4: Hanging Your Art
Once you are happy with your layout, start by measuring the distance between each of your pieces. It can help to draw a picture of your layout so that you can write down all the dimensions and spacing.
Once measured, mark on your wall with a grey lead pencil where to place your hooks. If you make a mistake you can easily rub out the pencil marks.
We recommend using self-adhesive hooks rather than nails so that you can easily peel the hooks off the wall if you want to re-arrange your gallery. However, some of your larger pieces may require picture hooks depending on their weight.
If you have a picture rail in your home, another tip for hanging your gallery wall is to use clear fishing. This gives the impression of your art floating from the picture rail, and allows you to hang your frames at different heights.
Tip 5: Stand Back & admire
Gallery walls are best viewed from a distance, so take a step back and admire your work!


